| Mars Clock | ||||||||||||||||
| Main | Construction | Operation | Schematics | Code | HowTo | Other Projects | ||||||||||
The clock display is a 2x16 LCD module. The first row always shows the currently selected timer. The second row is used to show either the Julian time, or the current menu selection:

The sixteen timers are named
TmA, TmB and so on, through TmP.
Here, TmA is the name of the timer, followed by the current time. The second row shows the same time in Julian format (useful for astronomy and other things). The keyboard looks like this: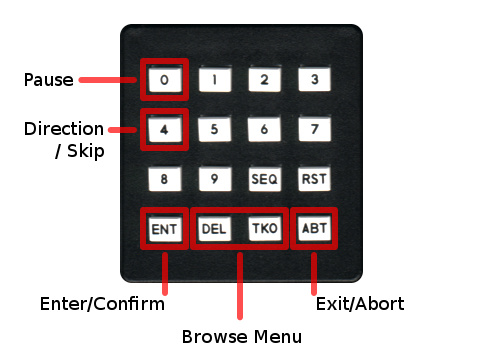
Not the best layout, but this is what I had on hand when I was making the clock. If you decide to build this project and have a keyboard with different layout, check Using Different Keyboard in the Code section.
The user interface of the clock is organized in menus. Pressing the
 and
and  buttons will let you browse through the entries of a menu. Pressing the
  will select an entry (and perform the associated action with this entry - open another menu, set a value, etc). Going out of a menu is done by pressing the button. This will bring the previous menu up. Here is a diagram of the clock menus, followed by detailed description of each menu:
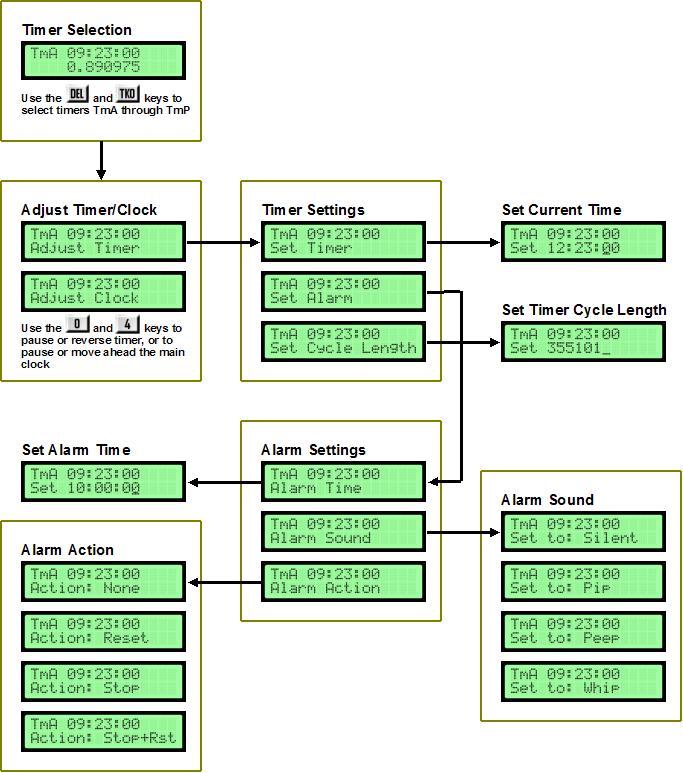
Main Menu - Timer Selection
When the clock is just powered up, you are in the "Timer Selection" menu (the screenshot above). In this mode, you can browse through the 16 timers -
TmA through TmP (as with any menu, use the and buttons to select timers).
If you are not sure which menu you are in, pressing the  button several times will bring you to the main menu.
Adjusting the Time [select timer,
]If you want to change something about a timer - to set up the time, adjust the timer rate, set up an alarm, etc. select the given timer and press the
button. This will bring the next menu, with two options:

When the
Adjust Timer option is visible, you can use the  button to pause and restart the timer, and the
  button to switch timer direction (forward or backward). This will affect only the currently selected timer.
When the
Adjust Clock option is visible, you can make adjustments to the clock that will affect all timers. Pressing the button to pause and restart the clock. Pressing button will cause the clock to jump forward one second. This way you can adjust the correct time without resetting each timer independently.Timer Settings [select timer,
]Select a timer, and press the
button twice (once to get to the Adjust menu, and the second time to choose the Adjust Timer option). This will show you the next menu with the following options:


Selecting the
Set Timer option and pressing will show you a screen where you can enter the new time.
Enter the time using the number keys. The new time will be set when you enter all six digits (HH:MM:SS) or when you press the button.
Pressing at any time will abort the operation and the time will not be set.If you select the
Set Alarm option, this will let you set the alarm time, sound, and action. This menu is discussed later.To change the timer to something other than the length of a standard Earth day (24 hours), enter the new length by selecting the
Set Cycle Length option.
For more details, and some sample values (for example, how to make a timer run on Mars time), check Setting the Timer Cycle Length in the How-To section. Confirm the new cycle length with the button, or cancel the operation at any time by pressing the button.Alarm Settings [select timer,
, select "Set Alarm", ]Each timer has an alarm associated with it. This menu will let you choose between the following options:


To set the alarm time, choose the
Alarm Time option and press . Enter the time. As usual, the will confirm and the will cancel the operation at any time.Selecting the
Alarm Sound option will bring you to a menu where you can choose between the following sounds: Pip, Peep, Whip and Silent. When activated, the alarm will play a short beeping sound, a long beeping sound, or something that sounds like Whiiiiip! If you select Silent, the alarm will not play any sound.Finally, the
Alarm Action option lets you choose what should happen to the timer once the alarm is activated. You have the following choice: None (no action, apart from the sound that is played), Reset (the current timer is reset to 00:00:00 and counting goes on), Stop (the current timer is stopped), and Stop+Rst (the timer is stopped and reset to 00:00:00).